
Processing Tab
After uploading core images along with relevant metadata (e.g. core loss) to the Platform, the images will undergo processing through an image processing pipeline. This process includes tasks such as image cropping, and box and row detection, with the results being displayed in the initial tab labeled Processing.

In the Processing tab, you have the option to delete images, search through results, view uploaded metadata files, and edit metadata for each image. You can manually update box numbers and depths by selecting the green pen in the top left corner of the image. Any changes made to the image data will require the Image Preparation to be re-run for the updates to take effect. The notification box will alert you to these changes, and the orange action dialogue box will become available for further actions.

Within the Processing tab, users have the option to download box imagery or internally delete/upload Metadata (CSVs).
Depth Registration Tab
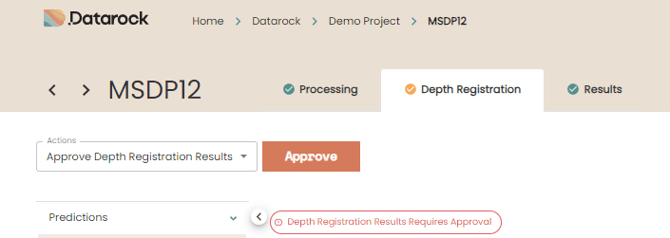
Moving on to the Depth Registration tab, this section will showcase the outcomes of the Depth Registration Process, where depths are assigned to every pixel in the row images. By taking into consideration image depths, core loss, and handwritten depth markings on the core, the process ensures accurate depth assignments even when dealing with broken rock formations.
Any errors or warnings related to Depth Registration will be highlighted in the notification view. An essential part of the processing workflow is the Depth Health Check, which identifies any discrepancies in depth compared to the provided information. This step helps in catching potential human errors that could impact subsequent models. Users can review and address these errors by accessing hyperlinks to the relevant imagery in the Notification tab.

After reviewing and addressing any errors by either fixing them or marking them as accepted, you can proceed by selecting Depth Health Check Approval to move on to downstream models like RQD. Remember, any modifications made will require the Depth Registration pipeline to be re-run, automatically triggering updates in Image Preparation as well. Keep an eye out for the Depth Registration tab icon turning green once all changes have been accepted.
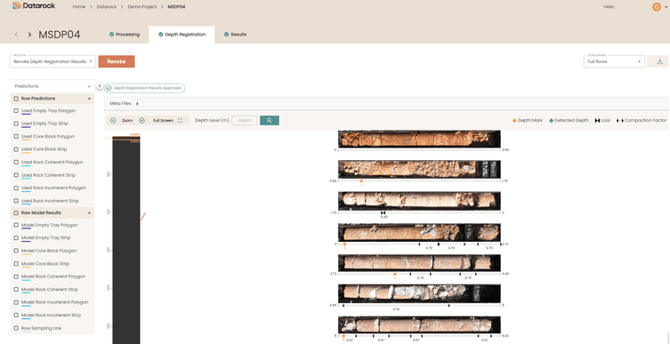
Additionally, users can utilize the Predictions pane within the Depth Registration tab to switch on model predictions like coherent or incoherent rock. Depth marks, core loss, and predictions for compacted loose material can be easily toggled at the top right corner of the image viewing pane.
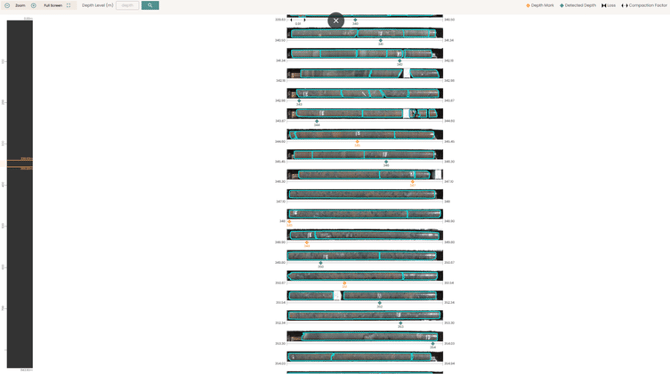
Users can utilize the Deep Zoom window, which serves as an imagery viewing window, allowing them to navigate down the drill hole to examine data at a particular depth. The Depth search icon enables the input of a specific depth for viewing. The Deep Zoom feature offers different zoom scales and full-screen mode options, as illustrated below with predictions applied.
Users can also utilize the Depth Registration tab to easily download artifacts or row imagery with a variety of overlay options available, as shown below.

Results Tab
Within the final tab of the Platform sequence, known as the Results Tab, users have the opportunity to observe all models that have been applied to the drill hole using the Deep Zoom viewer. These models are visualized as colored masks overlaid on the core or as strips below the core, in accordance with the model legend.
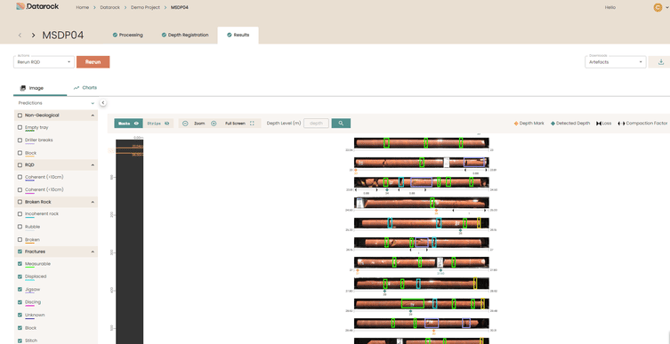
If relevant, users can also access model outputs in the Charts sub-tab. Here, you can view model results alongside ground truth data and site-logged information (if RQD metadata files are uploaded). Charts can be displayed in default platform settings or based on the logged ground truth intervals.

Users have the option to download all generated results as CSV files by accessing the Artefacts section in the downloads bar.