
Overview
The project landing page showcases all uploaded drill holes, the models applied to each hole, and the available processes for analysis.
More detailed information on each highlighted feature is presented in the following sections:
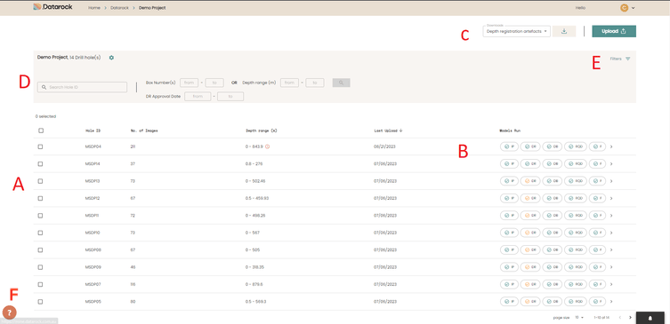
A - Drill hole list
The list of drill holes offers a comprehensive view of the uploaded data on the platform. Users can utilize the selection box beside each drill hole to choose multiple or individual holes for applying new models or downloading model and data outputs.
B - Processing status
Color-coded pill box icons provide a visual representation of the models executed on individual drill holes and their corresponding status. A green tick signifies successful execution, while a yellow exclamation indicates success with warnings to review, and a red exclamation denotes failure due to errors. By hovering over the icon, users can view the full model name and the date of execution. Clicking on any model will redirect you to the results page, displaying the specific drill hole and model applied.
C - Download menu
Users can select the data they want to download for each drill hole using the Downloads dropdown box. To initiate the download, simply click on the download icon next to the box. The requested data will then be sent to the recipient via email for download, with an access expiry date for security.
Depending on the models that have been applied to the data, you may have access to the following list of downloads:

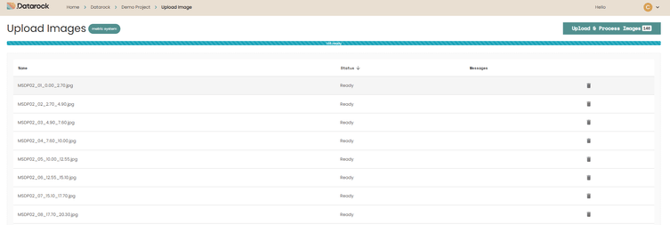
C - Upload page
The upload button located nearby allows users to upload imagery or metadata to the platform. It is essential to follow the Datarock CSV format and imagery file name format for a successful upload. Detailed guidelines are provided on the upload pages. Users have the flexibility to drag and drop data or upload from their computer files. During the upload process, a progress bar will be displayed, along with notifications for any errors (red) or warnings (yellow) that need attention. Warnings are highlighted in yellow on the platform but do not prevent users from uploading the images.
Once the platform has successfully uploaded the images, and if there is a green bar or green Process Images button visible, users can select the Process Images button. This action will prompt the platform to run the Image Preparation model for the specific drill hole.
Various files, such as core loss and sample/interval files for products like RQD and Fractures, can be uploaded to the platform. Examples of the required CSV formats are provided in the specific product descriptions.
After adding the CSVs, if there is a green Upload button present, users can select this button to upload the file to the relevant drill hole. Multiple CSVs can be added simultaneously. However, unlike uploading new images, uploading CSVs will not trigger the Image Preparation model (or any other model).
D - Drill hole search
Users can easily search for specific drill holes on the platform by utilizing search functions. These functions include searching by HoleID, Box Number(s) or Depth range, and DR model approval date, making it simple to locate the desired drill holes among a large number of uploads.
E - Search Filters
Depending on the models applied to the drill holes and their corresponding status, the Filter option enables users to refine the drill hole view based on specific parameters of interest. Below is a list of possible selections available for filtering.

F - Support
For additional assistance from the Datarock support team, simply click on the Help button located in the bottom left corner of the page. This feature offers access to guides and a direct channel to reach out to the team for technical support.
